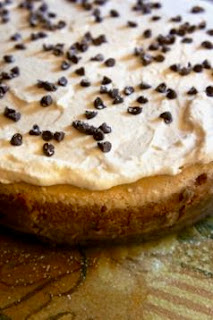
I love cannoli's and many years ago I made either a cannoli cheesecake or cake (I cant remember which is was), but it was just okay. However, this cannoli cheesecake was anything but just okay. It was so very delicious and the topping was very yummy.
Now for one bit of important information about this cheesecake. This one is baked in a water bath. The original blog where I found this recipe had a link for different way to wrap the springform pan for the water bath. However, I choose to wrap it the traditional way, with two layers of aluminum foil. Unfortunately, it did not work and water got into my crust. Kind of a big bummer, but the cheesecake was still very delicious, the crust was just not how it was suppose to be. So next time I need to bake any cheesecake in a water bath I will definitely be trying her method. Here is the link so you can check out this new method and try it when you make this cheesecake. If you do try it, I would love to hear how it worked for you.
Cannoli Cheesecake
Ingredients:
-
Crust
- 2 1/4 cups graham cracker crumbs
- 1/2 cup unsalted butter, melted
-
3 tablespoons
granulated sugar
Filling
- 20 ounces ricotta cheese
- 12 ounces mascarpone cheese
- 1 cup granulated sugar
- 3 tablespoons all purpose flour
- 1 teaspoon ground cinnamon
- 1 tablespoon vanilla extract
-
4 large
eggs, room temperature
Whipped Topping
- 1/2 cup heavy whipping cream, cold
- 5 tablespoons powdered sugar
- 3 tablespoons ricotta cheese
-
1/2 teaspoon
vanilla extract
Topping
- mini chocolate chips
- powdered sugar
-
Crust
- Preheat the oven to 325º F. Spray the bottom and sides of a 9-inch springform pan with cooking spray.
- In a large bowl combine all of the crust ingredients until well combined. Press the mixture into the bottom and up the sides of the prepared springform pan.
- Bake for 10 minutes, then set aside to cool.
- After 10 minutes prepare the springform pan for the water bath. You can use the traditional method of wrapping the pan in 2-3 pieces of aluminum foil or use the directions from the link above.
-
Filling
- Reduce the oven temperature to 300º F.
- In a large bowl add the ricotta cheese, mascarpone cheese, sugar and flour. Mix on low speed until just combined and smooth, scraping down the sides of the bowl as needed. Make sure to keep the mixer on low to reduce the amount of air added to the batter which can cause cracks and do not over mix.
- Add the cinnamon and vanilla extract and mix on low sped just until well combined. Add the eggs one at a time, mixing on low speed until combined. Scrape down the bowl as needed. Pour the cheesecake over the crust and spread into an even layer.
- Place the springform pan into a larger pan. Fill the larger pan with enough warm to go halfway up the sides of the springform pan. Do not go above the top edge of the aluminum foil on the springform pan.
- Bake for 1 hour and 45 minutes or until the edges are set and the center jiggles when the springform pan is moved, but not liquidy. Turn off the oven and leave the cheesecake in the water bath, in the oven with the door closed for 30 minutes. Do not open the door during the 30 minutes.
- After 30 minutes are done, crack the oven door and leave the cheesecake in the water bath, in the oven for another 30 minutes.
- Remove the cheesecake from the oven and then remove from the water bath. Remove the aluminum foil and anything else used to keep the water out. Refrigerate the cheesecake until completely cooled, about 6-7 hours or overnight.
- Once the cheesecake has cooled remove the ring from the springform pan.
-
Whipped Topping
- In a medium bowl add the heavy whipping cream, powdered sugar, ricotta cheese and vanilla extract. Mix on high speed until stiff peaks form.
- Spread the whipped topping on top of the cheesecake. Sprinkle with some mini chocolate chips and dust with powdered sugar.
- Serve immediately or refrigerate until ready to serve.
*Adapted from Life Love and Sugar.


No comments:
Post a Comment