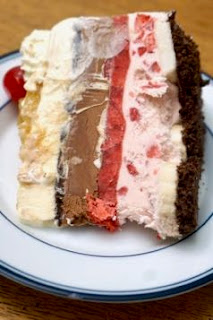
My husband is a big fan of banana splits and so I am, but most times I can never finish a whole one. So when one of my daughters requested an ice cream birthday cake, I knew exactly what to make.
I have had this recipe pinned for a long time, probably a few years. But I knew making it with homemade ice cream would take several days to complete it, so I would always just make a batch of ice cream that would be ready overnight. If you choose to make this cake with store bought ice cream, it would not take as long to make. But with homemade you need to let the ice cream maker insert refreeze before using again, so it make the process longer. But in the end, the several day process was worth it cause it was so delicious.
Banana Split Ice Cream Cake
Ingredients:
Crust
- 20 Oreo cookies, crushed into crumbs
- 4 tablespoon unsalted butter, melted
- 2-3 bananas, sliced into 1/2 inch thick slices
- 1 pint strawberry ice cream, softened
- 1 cup strawberry topping
- 1 pint chocolate ice cream, softened
- 1 cup hot fudge
- 1 pint vanilla ice cream, softened
- 1 cup heavy whipping cream
- 2 tablespoons powdered sugar
- 1/2 teaspoon vanilla extract
- 1/2 cup pineapple ice cream topping
- Maraschino cherries
- chopped nuts, optional
Crust
- Spray a 9 inch springform pan with cooking spray. Line the bottom and sides with parchment paper.
- Combine the Oreo cookie crumbs with the melted butter, stirring until all of the crumbs are evenly coated in butter.
- Press the mixture into the bottom of the prepared springform pan.
- Top with an even layer of banana slices.
- Place the pan in the freezer for at least 15 minutes.
- Top the bananas with the strawberry ice cream and smooth into an even layer.
- Place the pan back in the freezer until the ice cream has hardened up at least 1 hour.
- Gently spread the strawberry topping into an even layer over the strawberry ice cream.
- Return the pan to the freezer until frozen, at least 1 hour.
- Top the strawberry topping with chocolate ice cream and spread into an even layer.
- Place the pan back in the freezer until the ice cream has hardened up at least 1 hour.
- Gently spread the hot fudge into an even layer over the chocolate ice cream.
- Return the pan to the freezer until frozen, at least 1 hour.
- Top the hot fudge with the vanilla ice cream and smooth into an even layer.
- Cover the pan with plastic wrap and return to the freezer and freeze overnight.
- Right before serving make the whipped cream by combining the heavy cream, powdered sugar and vanilla extract. Using a whisk attachment on either an electric mixer or stand mixer, whisk until stiff peaks form.
- Transfer the whipped cream to a piping bag.
- Remove the cake from the freezer and carefully remove the side of the springform pan. Pipe the whipped cream into mounds around the top outer edge of the cake.
- Top each mound with a maraschino cherry.
- Fill the space in the middle with the pineapple topping and then chopped nuts if using.
- Dip a knife in hot water and then wipe clean before cutting the cake. Do this after each slice for the cleanest cuts.
- To store any leftovers, place the side back on the springform pan and close the latch. Cover the top with plastic wrap and aluminum foil and place in the freezer.
Enjoy!!!
Notes:
If you are using homemade ice cream, the best time to add it to the cake is right after making it, because it will be the perfect consistency.
If using store bought ice cream, pace the ice cream into the refrigerator for about 30 minutes before you needed it, so it can soften. Then mix it really well with a spatula so it is smooth and spreadable.


No comments:
Post a Comment