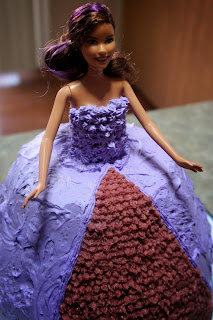
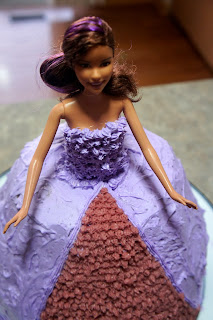
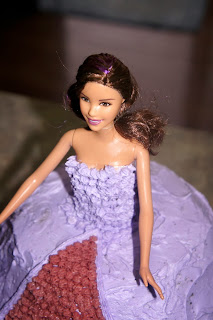
This post is a two for one. Not only are you getting a tutorial on how to make a Barbie cake, but you are also getting a recipe for a very delicious cake. I will explain how to make the Barbie cake first and then I will give you the recipe for the cake and the frostings. I will also include directions if you just want to make the delicious three cake layer and frosting.
For my youngest daughters birthday, she wanted a barbie cake. So I searched the internet to find the best way to make a barbie cake. After some searching I discovered there is no "best way", but I did find some tips to make to process easier and learned a few while preparing the cake.
The first step in making a Barbie cake and probably the most important is picking the Barbie (I used a simple beach Barbie.). Once you have the Barbie picked out you will want to measure the Barbie from the waist down so you know how tall your cakes will have to be. You want the cakes to come up to her waist so the cake skirt will look right (I used two 9 inch round cake pans and then one of my big mixing bowls.). Keep in mind that you will have some layers of frosting in between the cake layers, so that will give you a little extra height when it is all assembled. Once you have figured out what pans and bowls you are going to use you then need to prepare the Barbie herself. You will want to wrap the Barbie in saran wrap from her chest down to her toes making sure to keep her arms free and wrap the feet well. This way when you take the barbie out of the cake cleaning her up will be a breeze. Also make sure the saran wrap is tight around her bodice otherwise it will make decorating her a bit more difficult. Next you will want to tie her long hair up and out of the way so when you frost the cake her hair is not in the way and it does not get frosting all in her hair.
Once you have baked and cooled the cakes, it will be time to assemble the cake. Start with one of the round cake layers and cut out an oval shape in the middle of the cake making it just the right size for Barbie to fit through (I originally used a circle shape, because that was what I discovered when I researched it, but Barbie's hips are more of an oval shape and when I stuck her in there was some wiggle room and she was leaning a bit.). Make sure that this oval shape is just wide enough to fit Barbie's hips. Place the bottom layer you just cut an oval out of and place it on the second uncut circle cake layer. Using the first cake as a template cut out the oval shape in the second circle cake. Now you will need to cut the same size oval shape out of the mixing bowl cake layer, making sure to cut all the way down to the bottom of the cake layer. Place one of the round cake layers on a platter or plate or cake stand, whatever you have that will fit the biggest cake layer with some extra room for decorating, and spread a layer of frosting on top. Place the second circle cake layer on top of the frosting, making sure the oval cut outs line up and frost that layer. Now take the mixing bowl cake layer and cut it in half (you may notice in one of the pictures below I did not do this. I meant to, but I just forgot and every time I look at the picture, I kick myself for not remembering. Not only would it have looked better, but it would have given me that little extra height. Oh well next time, if there is one.) Place wider mixing bowl cake layer on top of the frosting, again making sure the oval cut outs line up, and frost that cake layer. Place the top half of the mixing bowl cake layer on top, once again lining up the oval cut out and crumb coat the entire cake (A crumb coat is a light layer of frosting on a cake to "seal" in any crumbs so you do not get any crumbs showing in the final frosting layer.). Refrigerate the cake to let frosting firm up a bit.
Once the crumb coat has had a chance to firm up insert the Barbie into the oval cut outs you made. If there is any wiggle room you can use the leftover pieces from the oval cut outs to try and secure Barbie better. Now it is time to put on the finish coat of frosting and decorate the skirt how you choose. Besides decorating the skirt you will also have to decorate the bodice of Barbie. Alternatively, you could buy a Barbie that had a plastic bodice and then you would not have to decorate that part (If you choose this type of Barbie you will only have to saran warp her from the waist down.).
Since my daughter wanted a flavored frosting in the middle of the cake I was able to use the leftover of that on the skirt in addition to the simple buttecream frosting I made and tinted for the crumb coat and final coat of the skirt.
Now on to the delicious cake and yummy buttercream. This cake was super moist and had a wonderful dark chocolate flavor that was accented so nicely by the raspberry buttercream. A perfect combination.
Dark Chocolate Cake with Raspberry Buttercream
For Barbie Cake
Cake Ingredients:
4 cups all purpose flour
2 cups dark chocolate cocoa powder
4 cups granulated sugar
2 teaspoons baking soda
2 teaspoons baking powder
2 teaspoons salt
4 large eggs
2 teaspoons vanilla extract
2 cups sour cream
1 cup canola oil
2 teaspoons white vinegar
1 1/3 cups hot water
Raspberry Buttercream Frosting Ingredients:
2 cups unsalted butter, softened
1 1/2 cups raspberry jam, strained and seeds discarded
3 cups confectioners' sugar
Cake Directions:
Preheat oven to 350° F. Grease and flour two 9-inch round cake pans and one large mixing bowl and set aside.
For mixing the cake ingredients you have two choices. If you have a gigantic bowl you can mix all the ingredients in that and then pour half of the cake batter in the prepared large mixing bowl and then divide the remaining cake batter in half between the two prepared 9-inch cake pans. Or you can use two large mixing bowls and divide each ingredient in half placing it in the two separate bowls. Then one bowl of batter will be for the large mixing bowl and the other bowl of batter will be divided between the two 9-inch cake pans.
Combine the flour, cocoa powder, granulated sugar, baking soda, baking powder and salt. Add in eggs, vanilla extract, sour cream, oil, vinegar and hot water. Mix with a non metal spoon until batter is smooth.
Pour batter into prepared pans and bake for 35-40 minutes or until an inserted toothpick comes out clean. The mixing bowl cake will take slightly longer to bake; it could take up to an hour or slightly more. Check on the mixing bowl cake every 5-10 minutes until done. Cool cakes in pans on a cooling rack for 20 minutes. Remove cakes from pans and cool completely on cooling racks.
Raspberry Buttercream Frosting Directions:
In a stand mixer or with and electric mixer beat butter and jam together on medium speed until fluffy. Add sugar in batches beating until smooth.
Spread the filling between the cakes layers.
*Adapted from Grandbaby Cakes.
Quick Vanilla Buttercream
Ingredients:
3 cups confectioners sugar
1 cup unsalted butter
1 teaspoon vanilla extract
1-2 tablespoons whipping cream
In a stand mixer fitted with a whisk, mix together sugar and butter on low speed until well blended and then increase speed to medium and beat for another 3 minutes.
Add in vanilla and cream and continue to beat on medium speed for 1 more minute, adding more cream as needed to reach desired consistency for spreading and decorating.
*Adapted from Food Network.
*Directions, along with tips, for assembling the barbie cake are outlined above with the pictures.
Dark Chocolate Cake with Raspberry Buttercream
As a traditional layer cake (not Barbie cake)
Ingredients:
Cake Ingredients:
3 cups all purpose flour
1 1/2 cups dark chocolate cocoa powder
3 cups granulated sugar
1 1/2 teaspoons baking soda
1 1/2 teaspoons baking powder
1 1/2 teaspoons salt
3 large eggs
1 1/2 teaspoons vanilla extract
1 1/2 cups sour cream
3/4 cup canola oil
1 1/2 teaspoons white vinegar
1 cup hot water
Raspberry Buttercream Frosting Ingredients:
2 cups unsalted butter, softened
1 1/2 cups raspberry jam, strained and seeds discarded
3 cups confectioners' sugar
Chocolate Ganache:
4 ounces bittersweet chocolate, finely chopped
1/2 cup heavy whipping cream
1/4 cup light corn syrup
2 teaspoons vanilla extract
Cake Directions:
Preheat oven to 350° F. Grease and flour three 9-inch round cake pans and set aside.
In a large mixing bowl, combine the flour, cocoa powder, granulated sugar, baking soda, baking powder and salt. Add in eggs, vanilla extract, sour cream, oil, vinegar and hot water. Mix with a non metal spoon until batter is smooth.
Divide batter evenly into prepared pans and bake for 35-40 minutes or until an inserted toothpick comes out clean. Cool cakes in pans on a cooling rack for 20 minutes. Remove cakes from pans and cool completely on cooling racks.
Raspberry Buttercream Frosting Directions:
In a stand mixer or with and electric mixer beat butter and jam together on medium speed until fluffy. Add sugar in batches beating until smooth.
Spread some of the filling between the cakes layers and crumb coat the entire cake. Refrigerate for about 30 minutes or until the frosting is set.
Use the remaining frosting to frost the entire cake. Refrigerate the cake again for 20-25 minutes.
Chocolate Ganache Directions:
In a small pan, over medium heat, heat the heavy cream until it just begins to boil. Remove from heat and add in chocolate and let it sit for 2 minutes.
Whisk together the cream and chocolate until nice and smooth.
Whisk in corn syrup and vanilla extract.
Remove cake from refrigerator and pour warm ganache over the middle of the top of the cake and allow to drip down the sides.
Let the ganache to set up for about 30 minutes before serving.
*From Grandbaby Cakes.


No comments:
Post a Comment